
Screen printing is a fun and creative way to make custom t-shirts, posters, and other items. You can learn how to make screen print transfers at home with simple supplies. This guide will walk you through the basic steps and equipment needed.
To start, you’ll need a screen printing kit. Look for a kit with a silk screen, squeegee, ink, and transfer paper. Silkscreens come in various mesh counts, with higher counts providing more detail. For beginners, a 110 mesh screen is a good choice. You’ll also need a work surface that you can get messy, like an old table covered in newsprint.
Prepare Your Image
You can screen print any image or text as long as your design is a single layer. Complex multi-layered images won’t work for hand screen printing. Create your image or text in a graphics program, resize it if needed, and print it out. Place the printout face down on the screen and tape it in place.
Coat the Screen
Coat the mesh side of the screen with a thin layer of emulsion or screen printing ink. This seals the mesh so ink won’t leak through. Allow the coating to dry per package directions. Place the screen emulsion-side down on a flat surface and center your image underneath it. Use a utility light or sunlight to trace the image onto the screen. The light will cure and harden the emulsion.
Wash Out the Image Area
Wash off the emulsion from the traced image area using warm water, revealing the mesh. Rinse thoroughly and allow to dry completely. Your image should now be visible in the mesh. Touch up if needed with more emulsion.
Add Ink
Prepare your ink according to package directions and pour a small amount onto the screen inside the frame. Hold the squeegee at a 45-degree angle and drag it across the screen, applying even pressure. This will force ink through the open mesh to create your image on the paper below.
Heat Set the Ink
Remove the paper and heat set the ink using an iron or heat press. Refer to the transfer paper instructions for proper times and temperatures. Avoid overheating, as this can scorch the ink. The ink should now be permanently fused to the paper.
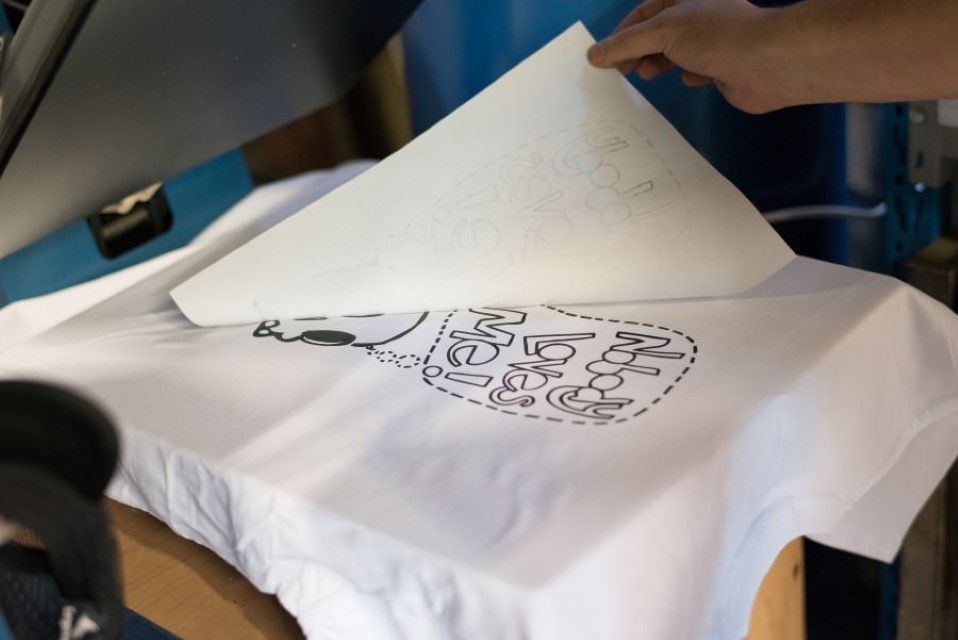
Print the Transfers
You’re ready to print transfers! Lay your shirt or other item on a flat surface. Place the transfer paper ink-side down onto the shirt. Press the iron onto the back of the paper for 30-60 seconds. Let cool, then gently peel back the paper. Your graphic should now be successfully transferred.

Tips for Better Results
Here are some handy tips for getting great results as you learn to screen print:
– Use a fill stroke around images to provide a frame for cleaner edges.
– Print multiples of the same image to speed up the process.
– Apply an even coat of emulsion and allow it to fully dry to prevent leaks.
– Keep a thin layer of ink on the screen and make several passes for bold colors.
– Use gentle pressure and avoid sliding the squeegee to prevent smudging.
With some practice and experimentation, you’ll be able to create awesome custom screen-printed apparel and more right at home. Screen printing is a fun way to take your graphic design skills to the next level.